Tip of the Week - Making a Nuke Gizmo
It's been a while since I wrote a Tip of the Week. This week's one covers how to make a gizmo in Nuke. A Nuke Gizmo is a collection of nodes that accomplishes something in one grouping. It's similar to a Shake Macro. The advantage of Nuke's gizmo is that it is not server side based, so you can create any number of custom gizmos, and launch them on a farm, and it'll run them, unlike Shake macros, which prefers a centralized location. Another advantage is that Nuke's automatic gizmo creation is far superior to Shake's automatic macro creation wizard. How so? Hit the link below and follow along.
This quick gizmo is called BufferWrite. It acts as a prerender for a ReadIn and WriteOut, and allows you to bypass it as such. Let's start by making sure what we want to do. We want a readin for sure, and a write out.
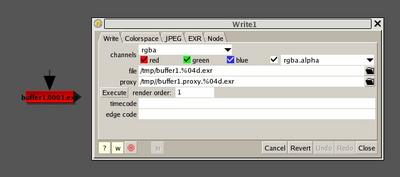
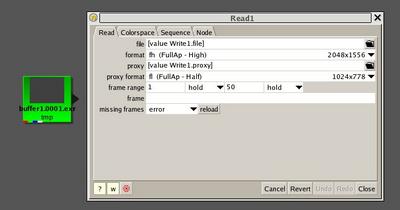
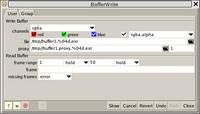
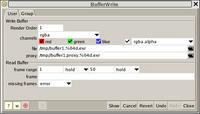
For our purposes I've put in a holder writeout called /tmp.buffer1.%04d.exr and /tmp.buffer1.proxy.%04d.exr. Feel free to change them to what you want. Also by default I set up the channels to be exported as RGBA. We want this selectable in the gizmo, but we'll worry about that later. We'll also set up an option to change the file and proxy names in our gizmo too. In our read in, we'll reference the knob for write filename, as shown below. By using [value Write1.file], we're taking our writeout node, called Write1, and reading in the value called .file. I'm also doing the same for the proxy value as well.
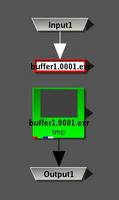
Once we do this, we select our nodes we want in our gizmo and group them, by hitting CTRL-g. If your group doesn't look like the one below left, feel free to rewire it so it does. We can also add nodes directly into our group, so let's do that now. Add a NoOp or Dot node. We'll also want a switch node, to allow us to switch from the ReadIn and the rest of the tree above the gizmo.

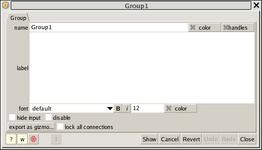
Now we have the basics of our gizmo. Now we're going to add controls so we can bypass the read node, and instead use the tree. Our group should like this, below. We're going to start customizing it! Go ahread and rename it to what you want. I just call it BufferWrite. This will be the name of the gizmo. Then, right click next to the tab and you'll get a menu like the one below right.
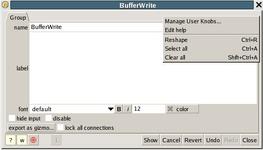
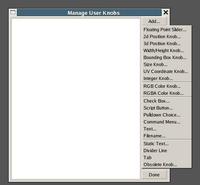
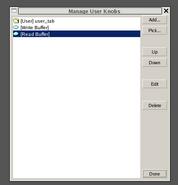
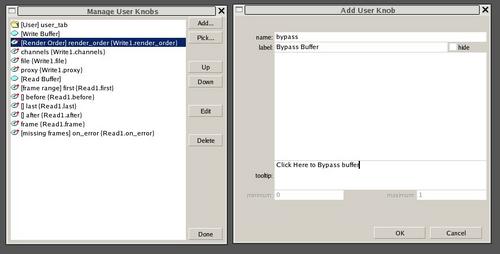
Once we open up the manage user knobs section, we'll click on the Add button, and it'll pop up the list below. We'll add two static text lines, to make it easier for users to understand what's going on. Add a static text line labelled Write Buffer and Read Buffer. You should get what's in the image to the right.
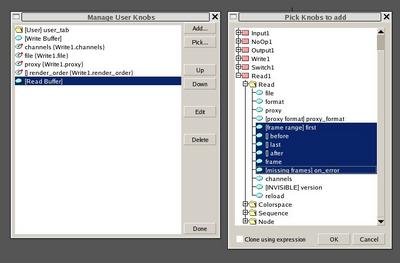
Here's where we get to make some interactivity! Click the Pick button. We can now pick which nodes to add to our gizmo. Pick the following and hit ok.

Do the same thing again, but this time, select the following. Now we have the basics of our gizmo.
Now we have the basics to our gizmo. It should look something like what we have below. It's kinda messy, so let's clean it up a bit. It should like this on the left. Rearrange the knobs so it looks like what's on the right.
We have our first gizmo! But wait, this doesn't allow us to use that switch that we have to bypass the read node! How do we add that to the gizmo? Ideally, it should just be a checkbox. Do the following. Click the Add button again, in Manage User Knobs. Select the Checkbox, and put in the values below. The name signifies how we can access the knob. The label is what it will be called in the gizmo, and the tooltip is what will show up when we hover over the option in the gizmo.
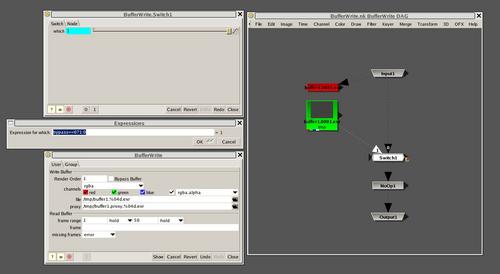
Just clicking the checkbox, nothing happens. It's not yet connected to our switch node! To connect it, we open our BufferWrite group again, and select the switch node. Click the graph to the right of the which option, and choose Edit Expressions. Put in what is shown below. In it, we're referencing the bypass checkbox, using a simple if?then:else statement. It's similar to other if else statements in other packages. We're saying that if bypass equals zero, then which=1, or else which=0.
And that's all there is to it! From here we can edit things like adding a help section.. Instead of just clicking Manage User Knobs, click Edit Help. Once you're done, save the script. Then, go into the Group tab and hit export as gizmo. You can lock all connections if you'd like, to make it less probable to rewire stuff inside the gizmo. Make sure you save your gizmo with a .gizmo extension. Place the gizmo where the rest of your gizmos reside (mine resides in /aruna/.nuke/gizmos/), and add the following into your menu.tcl file which should be located in your Nuke directory. If not, you can always make it.
menu "ArunaTools/BufferWrite" "#A" BufferWrite
This will add a nice submenu and add a hotkey for it, which is Alt-A. If you don't like to have a new menu called ArunaTools, then you could just replace it with Other. This is a fairly simple gizmo, which shows you how to pick and add knobs to a group, expression link a user created knob, and export it out. If you have just read all this, and have no desire to actually create this gizmo, Click here for it, lazybum.

Leave a comment