Tip of the Week - Keying 2
It's getting a little late, after a bunch of crazy shenanigans last night (which I'll discuss in a different post). Today I'm going to go into a little bit more detail with a bluescreen key, using our actor, a wonderful cat!
Below we have our wonderful cat model. You can always click on the image to view a full screen one! Since compositing packages vary, I'll try by best to guide you through a process to get a decent key.


Using a simple color select of the cat image, we're able to get a fairly decent pull of the cat. You'll notice that there is some remaing blue information on the outskirts of the composite, which we'll fix.


By altering a couple variables, namely shadowGain, midtoneGain, and highlightGain (variables in Keylight, in Shake), we are able to increase the quality of the key. If we look at the alpha, we'll see this image. As you can see, there is still some outlying regions which contain some darker blues. We could try and key those out, but since our cat never ventures close to that, we'll just roto the offending chunks out.
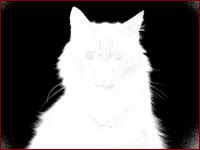

You'll notice that we have some eat through in our cat. We can fix this by creating another roto, or by adjusting our key a little bit more. It takes a considerable amount of tweaking to get both a nice edge on the cat, as well as a decent, solid inside. For this example, I'll do a quick soft roto inside the cat since he's fairly still.


We'll finish this exercise by applying similar grain.

In a future tip, I'll discuss how we can integrate the foreground and background footage to blend in a bit better, using lightwraps, edge blurs, and color shifts! If you'd like to work on this cat sequence, click here for a 38.2MB zip of the frames. If you have any questions about the above techniques, just write a comment and let me know! And if you think it sucks, I'd like to know that too.

Leave a comment