Tip of the Week - Edge Color Correction
A more advanced tip this week, which covers greenscreen and bluescreen edge correction. Sometimes you get an annoying halo around an actor after you pull them off of a chromascreen, this little tip steers the edge colors back into the right direction.
I'm going to try and keep this simple and straightforward, but if there are any questions, just ask away. In the below sequence of images you can see the progression of an edge treatment, and how I go about creating it. Use whatever tools at your disposal. I used Shake, but this can be accomplished in any compositing package that has matte creation and color correction tools.
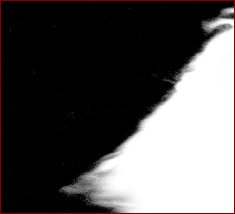
In our first and second images here, we can see the original greenscreen, and what happens when we remove the green from the image. Below those two, we can see the matte that I used to color correct the edge of the hair, and the result of that operation.
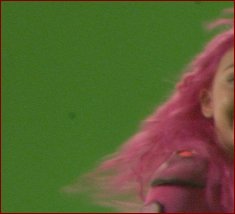


The technique I employ, which some compositors use, and some compositors don't, is the following. By apply a hue shift to the edge colors in the hair, you can shift the slight tinge of green left on the edge of your pull and push it back into the realm of the rest of the actor.


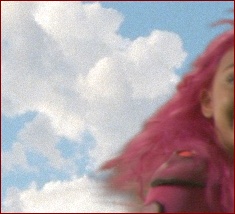
Below is the alpha and the resulting image over a sky I had laying around. You'll notice that there's still some alpha transparencies issues that I haven't addressed for the sake of time and simplicity. The meat of this tip has been described above.
And for those interested, here's a screenshot of this short, but vital tip. I have renamed some nodes from their default names, and this is using stock Shake nodes, so it can be recreated on your own system. Any questions or comments, you know where to put them!


Hi,
in the very last result image, the semitransperent hair tips are having thik dark look. This is even worse in my comp where there are semitransperent motion blurrs of hands fingers of the subject. When they are comped on the bg plate they look quite dark and one can make out that chroma is used. So, how would you blend such areas effectively with bg?
Thanks for keeping the compers domain live n kickin;-)
artfart3d
February 28, 2008 9:22 AM
There are a couple of tricks you could try. This tip is pretty old (and needs significant updating), and that image is a pretty bad example of a keyed hair edge! A trick you could try is to suppress your green to the same tonal level as your background. In the tip above, you'll notice that the green suppression puts the background into a dark grey. If it was a lighter grey, it would blend a little bit better with the hair and background. Some keying packages (Keylight, Ultimatte) allow you to input a background, which will replace the grey values with appropriate values so edges will become much nicer. I've found a better way to get nicer color edges, which I hope to share in the future in another Tip of the Week.
Aruna
February 28, 2008 11:17 AM
Thanks aruna will wait for it :-)
artfart3d
February 29, 2008 12:41 AM